Recommendation: Get a pre-dawn transfer by taxis to the south gateway, so you reach the first ascent within miles of the trailhead; the step minimizes heat and crowds, while the sunrise light adds crisp visibility. Said operators emphasize safety and pace over speed.
Route data shows daily distances of about 6-8 miles with vertical gains from 250 to 600 meters, depending on the segment. Prepare for uneven stones, weather shifts, and variable footing; a prepared boot plan and layered clothing keep you comfortable as you cover rugged sections. Overnight stays are typically in village inns along the south flank, with hot meals and basic amenities ready after each stage. The principal attraction is the ridge overlook at the high pass.
Permits and proof: a valid permit is required for protected sectors; carry your certificate of training or a formal permit, and ensure your passport matches the booking. Local screening at trailheads is routine, so arrive early to minimize delays. Along the route, a museum stop and a spot interpretive display offer historical context, while connecting viewpoints let you move in a seamless flow from fortress corners to ridge vistas.
america-based travelers often rely on local guides who know when to avoid crowded segments and when others are occupied, and how to book transport between trailheads. This advantage ensures a smoother experience, with efficient transfers between checkpoints and comfortable rest stops, yielding much flexibility for breaks. If you’re aiming for a minimalist approach, you can cover an initial segment of about 4 miles per day with careful pacing and sufficient water.
Where these routes converge, conservation zones protect habitat and reduce impairment from erosion. A guided loop balances ascent with descent, and includes a mix of outdoor segments and cultural stops at connecting points. A watchtower and a small museum comprise a focal spot that deepens understanding of the fortifications’ engineering and defense strategies, creating a seamless sequence across hills and rock, where visitors often pause at overlook spots.
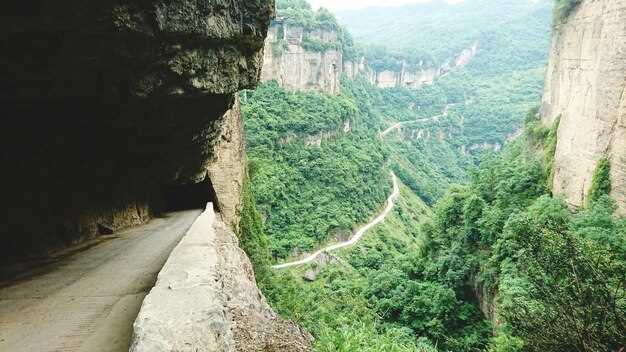
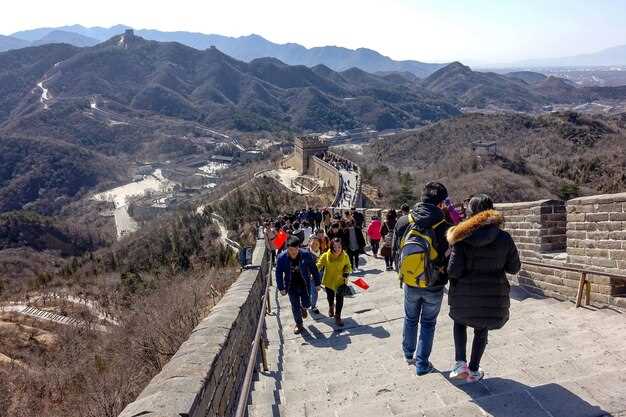
Best untamed Great Wall sections for a rugged day hike: Jiankou, Gubeikou, and Jinshanling options
Jiankou presents the most dramatic ramparts, with steep ladders and jagged steps. For a one-day planning, start before sunrise to catch calm atmosphere and avoid heat; plan about 240–360 mins of active hiking depending on route. Brian, a trusted local guide, notes that the main challenge is the natural terrain rather than signage, so bring sturdy boots and a map downloaded offline. Keep cash handy for tea stops and local services; wifi is unreliable along the escarpment, so rely on offline navigation. This option absolutely rewards quiet viewpoints and expansive vistas that feel far from crowds.
Gubeikou offers expansive, forested approaches and forked tracks that allow travellers to craft a pace to their liking, with fewer crowds and a more natural atmosphere. The two primary routes are divided but meet near the same section of the historic ramparts, so you can adjust based on time. Local schedules vary; plan around 60–90 mins of ascent and descent for the main segments. Public transport options are limited, so a driver or coaches may be the simplest solution for reaching the trailhead. If you want to include a sunset finish, this option is well-suited.
Jinshanling presents a balanced mix of preserved and rugged segments, making it the most approachable option for a longer day. The main trail is long but well-marked, with vantage points delivering expansive valley and hillside views. For pacing, allocate 5–7 hours including photo breaks; bring water, snacks, and a lightweight jacket for the evening breeze. The route supports online planning, but wifi may fade; downloading maps beforehand (including t3-e) helps. Arranging coaches or a local driver can ensure you meet schedules and stay within capacity limits.
Logistics and safety: Begin with a clear plan, confirm weather and access with a trusted operator, and keep your plan flexible. If you want to mix sections in a single day, arrange a china-operated transfer with a driver who can reach the trailheads via the main access roads. For local crews, cash payments are common; advance bookings with coaches or private transport can ensure a seamless transition between trailheads. For many travellers, the best approach is to hire a local driver and follow a prearranged schedule, avoiding delays that would push you past dusk. If you arrive by airways, ensure onward transport is arranged. Eligible hikers should confirm fitness before departure. Always bring a headlamp for evening returns, and ensure all participants are eligible for the hike; if impairment or mobility issues exist, choose a shorter option or adjust the pace. Before you depart, gather updates on the latest take-off times for transfers and confirm devices can download the maps you rely on. Guides such as those from guizhou and other regions can give advice, and classbusiness services are often offered to support seamless planning, including online bookings and local contacts. The plan can reach a full day if you manage capacity and time well; rethink if cant climb is encountered, and have a close plan for the return.
Source: UNESCO World Heritage Centre entry
How to time a climb on remote sections: start times, daylight, and pace
Begin at first light with a tight plan: check signage at the gate, depart early, and avoid late arrivals to minimize stress on the busiest sections. The fresh morning light makes the route feel exciting and helps you spot footing clearly as you move along natural features. Keep eyes over the edge for loose rock near drop-offs.
Planning start times and daylight
Start times vary by season, but aim to begin 60–90 minutes before the sun climbs high. In practice, civil dawn windows are roughly 05:40–06:30 in spring and autumn, 04:50–05:30 in summer, and 07:00–07:45 in winter for the Beijing area. Have a planned route and gate times, and check signage at the trailhead for any unexpected changes. Here, consider shade-rich options to stay cooler; there is often a lush contrast between shaded sections and sunlit rock; choose a line that keeps you in the centre of light for the longest stretch. If arriving here late, crowds increase and worry grows on the busiest segments. Each area along the climb offers different natural features; adjust the plan and share it with your partner to stay in sync.
Maintaining pace, safety, and logistics
Maintain a steady cadence across parts with careful breathing and footing. Break the climb into blocks: 15–20 minutes of ascent, followed by 2–5 minutes to rehydrate and snack. For steeper sections, slow your pace to conserve energy, especially near drop-offs at exposed edges. Carry liquids and aim for 1.5–2 liters per person, plus electrolytes in hot conditions. If weather shifts unexpectedly, slow further or take a safer alternative line. Rely on clear signage to confirm the route, and if you encounter a gate change or restricted segment, proceed with caution. Some parts feature fixed ladders or handholds–these specialities help you stay on track. If the busiest stretches feel stressful, let others pass and resume once space opens. Currently, plan for a buffer of 15–20 minutes to accommodate delays, and share the plan with your group so help is ready if needed. This approach suits the variety of terrain and keeps you moving through lush and natural zones without unnecessary worry.
Gear and safety for rugged trails: boots, traction, gloves, water, and weather prep
Recommendation: choose high-ankle boots with a stiff midsole and aggressive 4–5 mm lugs, plus a waterproof membrane and gaiters. Break them in for 2–3 weeks of wear. Avoid cotton socks; skip thick cotton on damp days; pair with moisture-wicking liners. For a daypack, keep baggage within an 8–12 liter frame and an allowance that keeps weight under 20% of body mass. Ensure lacing supports the heel and locks the foot without pinch, so morning starts don’t slow you down. Maintain steady breathing to keep airways clear as you climb. Pack with efficiency by placing rain gear and first aid near the top, not at the bottom.
Traction matters: on exposed rock and clay, a solid outsole with deep directional lugs is essential. In wet or icy sections, layer in microspikes or lightweight crampons and practice donning them. Mostly dry stretches still demand deliberate foot placement and occasional pole use. Instead of relying solely on heavy gear, balance boot design with lighter devices, and alternatively carry a compact traction system you can put on with gloves; check the tread often to prevent buildup that reduces grip.
Gloves safeguard hands in wind and spray: choose a waterproof outer glove with a grippy palm and a thin insulating liner for dexterity. Ensure the cuff seals around the hand to stop cold air from creeping in and to keep the glove from riding up when you grip trekking poles. Although some hikers tolerate cold hands, a layered glove system stays warmer. You may notice pressure at the temples if you heft a heavy pack; adjust straps to balance load.
Hydration and water strategy: target 2–3 liters per person for a day, scaled up on longer stretches. Use a bottle for drinking and a hydration bladder for quick sips. Treat water with a lightweight filter or chemical tabs if streams look uncertain. After long sections, take a short break to reset the stomach and plan the next leg, especially when you pass roadside stores or local cuisine temptations. Restrooms stops along the way help with toilet hygiene and hydration planning.
Weather and layering: check the forecast on the official website the night before and again in the morning. Eastern routes can shift quickly, so pack a layered system: base layer for wicking, a mid layer for warmth, and a shell for wind and rain. Include a compact rain jacket, hat, and sunglasses. For extended trips, carry a lightweight emergency bivy and enough calories to cover a worst-case day; last-minute changes still require adaptability, regardless of season, start early to avoid the last light of day and crowds during holiday periods.
Maps, navigation, and safety: carry waterproof maps and a compass even if you have a phone with offline maps. Checking the route and checkpoints with a reputable guide or on the route's official website helps avoid detours. Keep a small backup battery and a whistle. Leave a rough itinerary with a friend or hotel staff and bring a basic first-aid kit, spare batteries, and a headlamp. If public transit is needed, buses connect towns to trailheads; always have a plan for getting back, not just one-way. If conditions deteriorate, accept that you may need to alter plans rather than push through a hazardous section; maintain calm, especially after a slip or misstep.
Beijing-to-trailhead logistics: fastest routes, transfers, and typical costs
Direct door-to-trailhead transfer from central Beijing to the Mutianyu section is the fastest option: 2.5–3.5 hours, 350–550 CNY for a group of up to four, with a dedicated driver and minimal stops. For visitors seeking a culture-rich start, this route minimizes stress and places you directly at the base.
Fastest routes from Beijing to the trailhead
- Dedicated private transfer from a central pickup to the chosen access point (Mutianyu, Jinshanling, or Simatai). Time 2.5–3.5 hours; cost 350–600 CNY for 1–4 travelers; benefits: direct route, presence of a driver, no transfers, early start, and a comfortable environment.
- Guided shuttle from hotels: organized small-group shuttle to the same access points. Time 3.0–4.0 hours; cost 180–260 CNY per person; helpful for visitors who want a planned stage with a social element.
- Public transit option: subway to a northern hub plus local bus or taxi to the trailhead. Time 3.5–5.0 hours; cost 40–90 CNY; useful for budget travelers, whether solo or with a group, but coordination and weather can add stress. Areas served include Huairou, Miyun, and Shicheng.
- Fly-plus-drive (rare): flights to a nearby airfield are possible but not common; add time and cost; only viable if you combine with other legs and have flexible refunds.
Costs, procedures, and practical tips
- Costs at a glance:
- Private transfer: 350–550 CNY one-way for up to four passengers.
- Navette : 180–260 CNY par personne (aller-retour souvent moins cher lorsqu'il est groupé).
- Transport en commun : 30 à 60 CNY pour les trajets urbains ; taxi pour la suite 60 à 120 CNY.
- Frais d'accès : les téléphériques ou ascenseurs, s'ils sont disponibles, coûtent généralement entre 100 et 180 CNY aller-retour à Mutianyu ; les autres sections ont des frais séparés.
- Procedures and booking:
- Check refund options; private transfers often offer 24-hour refunds with nominal fees; airline tickets follow airline-specific rules (see airline-specific).
- Lors de la réservation, demandez un véhicule dédié afin de réduire les transferts et d'éviter les étapes cachées dans l'itinéraire.
- La disponibilité de covoiturage (Didi) est forte pour le dernier kilomètre depuis les parkings ou les points de dépose ; cela permet de réduire les temps d'attente.
- Que vous voyagiez en solo ou en groupe, confirmez le point de prise en charge exact et l'itinéraire prévu pour éviter tout retard.
- Tips for maximizing comfort:
- Choose a hike level that matches your fitness level; plan the route and stage breaks accordingly.
- Apportez de l'eau et des collations ; assurez-vous de connaître l'itinéraire prévu et de savoir si l'accès est autorisé dès le début de la journée.
- Préparez-vous aux changements de temps ; les crêtes perchées peuvent être venteuses et fraîches à l'aube ; emportez une veste légère.
- Soyez attentif à l'environnement ; réduisez les déchets et respectez les bâtiments situés à proximité de la base et des points de départ des sentiers.
- Fait : la présence d'un personnel dédié ou d'un guide améliore la sécurité et aide les visiteurs à se familiariser avec la procédure avec un minimum de friction.
- Notez les bâtiments le long des voies d'approche ; restez sur les itinéraires autorisés pour protéger le terrain et l'histoire.
- des vues mystiques au lever du soleil sur certaines sections offrent une ambiance mystique qui rehausse l'expérience globale.
- Additional notes:
- If you prefer to combine with a culture-focused stop, plan a short cultural loop in Beijing before departure; this is common for visitors who want a balanced experience.
- Pour réduire les risques, acceptez les changements de plan, surtout pendant les périodes de pointe où les zones autour des points d'accès peuvent être bondées.
- Lorsque des vols sont inclus, examinez les règles et les options spécifiques à chaque compagnie aérienne dans les conditions générales propres à la compagnie aérienne ; pour ceux qui envisagent un voyage en avion, les choix de tarifs domestiques des compagnies aériennes peuvent offrir des options moins chères et remboursables.
- la planification d'itinéraires doit prendre en compte l'étape de votre randonnée ; un itinéraire simple et direct est généralement le mieux adapté aux débutants, tandis que les visiteurs expérimentés peuvent préférer une option plus longue et plus pittoresque.
- Si vous devez modifier vos plans, la politique de remboursement peut varier selon le prestataire ; vérifiez-la lors de la réservation pour éviter tout stress supplémentaire.
- L'acceptation des changements de dernière minute est courante ; gardez un plan de repli prêt pour les changements météorologiques ou les variations de foule.
- Cette approche de base réduit le temps de trajet et aide les visiteurs à se concentrer sur l'environnement et le patrimoine plutôt que sur la logistique.
Horaires des vols internationaux : fenêtres d'arrivée recommandées à l'aéroport et conseils d'enregistrement
Arrivez au moins 3 heures avant les départs internationaux dans les aéroports chinois ; en été et pendant les périodes de vacances, prolongez jusqu'à 3,5–4 heures. Cette base de temps permet d'économiser du temps aux comptoirs et à l'immigration, en particulier dans les centres animés où les files d'attente peuvent s'étendre. Dans plusieurs cas, un retard d'arrivée conduit à manquer l'embarquement ou les changements de sangle au contrôle de sécurité.
Le fait de s'enregistrer en ligne devrait être votre première étape pour la plupart des marques ; cela permet de gagner du temps et de se rendre directement au dépôt des bagages ou à la sécurité. Si vous devez vous enregistrer aux comptoirs, dirigez-vous vers les comptoirs internationaux dédiés et gardez vos documents organisés. Les aéroports régionaux présentent souvent des files d'attente plus courtes, mais les étés chargés peuvent modifier le flux ; ayez votre passeport, votre visa et votre PNR prêts pour accélérer la vérification aux premiers points de contact.
Au comptoir, présentez clairement votre passeport et la vérification de votre visa, et suivez les instructions du personnel. Dans le cas de plusieurs voyageurs, désignez une personne responsable pour présenter les documents et gérer les transferts entre les comptoirs. Suivez attentivement les étapes de vérification et soyez prêt pour un contrôle rapide de l'identité et la vérification des formulaires qui peuvent se produire dans plusieurs segments du processus.
Emballage soigné : les articles cabine doivent éviter les appareils électroniques non 3c lourds jusqu'à l'inspection ; placez les appareils électroniques dans un bac séparé selon les instructions. Conservez les liquides dans un sac transparent (les règles de 100 ml s'appliquent le cas échéant) pour accélérer l'examen de sécurité, et évitez de placer des articles fragiles sous pression ; si vous apportez des souvenirs naturels comme des pierres, déclarez-les lorsque cela est requis et emballez-les dans vos bagages enregistrés lorsque cela est possible. C'est pourquoi une trousse compacte et organisée est utile.
Les transitions entre les zones sont importantes : après le contrôle de sécurité, suivez la signalétique jusqu'aux portes ; utilisez les mises à jour de vols fréquentes sur les écrans numériques pour anticiper les changements de porte. Si vous effectuez une transition par un hub régional, prévoyez du temps supplémentaire pour les déplacements sur les escalators et dans les couloirs, et restez attentif aux départs de dernière minute pendant les périodes de pointe et les pics de vacances.
Lorsque vous planifiez une escale près de destinations comme Fanjingshan ou d'autres points d'arrêt de base, prévoyez une marge pour les vols intérieurs dans le réseau chinois. Certains itinéraires offrent des options économiques via des marques populaires, avec 39 liaisons directes ou des compagnies aériennes équivalentes qui rationalisent l'embarquement. Pour les escales plus longues, envisagez d'utiliser les douches ou les salons ; de nombreux aéroports proposent des salons économiques qui réduisent la fatigue du voyage et vous permettent de vous ressourcer avant la prochaine étape.
En résumé : planifiez votre itinéraire de l'enregistrement à l'embarquement, prévoyez 3 heures (3,5 à 4 heures pendant les périodes de pointe), utilisez l'enregistrement en ligne, gardez vos documents prêts pour la vérification et suivez les panneaux indiquant la sécurité et les portes d'embarquement. Pendant les étés chargés, ces étapes deviennent essentielles pour maintenir une vie sereine et colorée en déplacement et pour protéger votre plan de base pour ce prochain chapitre d'aventure.